Showing posts with label Family Recipes. Show all posts

Friday, January 22, 2010

Broccoli with Balsamic Dressing

Photobucket

Are you guys tired of your same old broccoli recipes? Will you only eat these little green trees if they are covered in cheese? Well, we hate to break it to you, try not to cry, but you might as well skip the broccoli and eat just the cheese.

Our mom has been making this recipe since we were little. Since day one we have loved it and we hope (know) you will too!

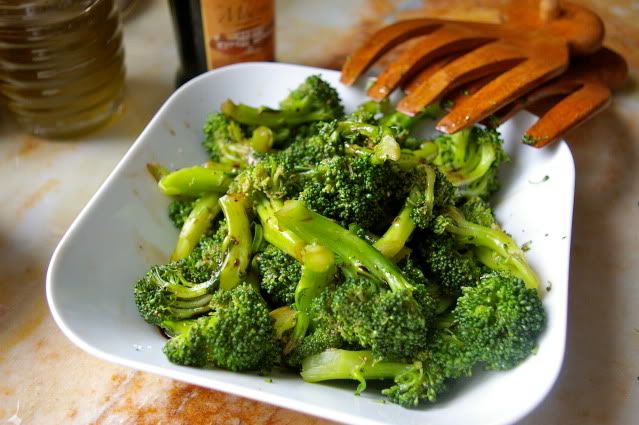
Here is a delicious way to eat broccoli and not only is it super easy to make, it is very healthy for you.
We've been tying to eat really healthy lately. We're about to get into juicing vegetable and fruits.

Do any of you juice??

By any means this does not, we repeat, DOES NOT mean we will stop baking! Just maybe a little less...

Well as for the recipe, here it is:

Ingredients:
2 head of Broccoli, cut into florets and stalks peeled.
5 Tbsp of Balsamic Vinegar
2 Tbsp of Extra Virgin Olive Oil
1 1\2 tsp Salt
1\2 tsp Black Pepper

Directions:
Fill a medium pot halfway with cold water over high heat. When the water comes to a boil, add the salt and broccoli. Let the broccoli cook for 5 minutes. They will turn a bright green color and be tender, but not mushy. The longer you cook vegetables, the more nutrients you loose.

Drain the broccoli and place them in a medium bowl. Let cool for 10 minutes. In the mean time, mix the remaining ingredients in a small bowl.

Once the broccoli have cooled down, pour the dressing in and toss the broccoli.

We serve these at room temperature.

Photobucket

We hope you guys enjoy our recipe!


Tuesday, January 5, 2010

Fresh Pasta = 2 Ingredients

Photobucket

Pasta is pretty straight forward. Flour and eggs, mixed, rolled, cut and boiled. Many people can be intimidated when it comes to making pasta. Some may think that it's something that they cannot pull off and won't give it a try.

We want people to realize how easy and FUN it is to make fresh pasta. The end result is so rewarding and comforting. Even though we always use store bought pasta when cooking, there is no comparison when it comes to a fresh plate of pasta. It completely takes the dish to another level!

If you have eggs, flour, and a pasta machine you can have fresh pasta in a little over an hour!

Start by placing 3 1\2 cups of all purpose flour on a wood cutting board.

Photobucket
Make a well in the center deep and wide enough to hold 5 large eggs.
Photobucket
With a fork, whisk the eggs and start to incorporate a little of flour.
Photobucket
Once you get almost half of the flour incorporated, start to use your hands. It gets messy but don't worry!
Photobucket
Once everthing is all set, start kneading the dough for 10 minutes with the palms of your hands.
Photobucket
The dough should be stretchy and slightly sticky. Wrap in plastic wrap and let the dough rest at room temperature for 30 minutes.
Photobucket
Cut the dough into 4 pieces. Take the first piece, keeping the other 3 still covered, and start stretching it through the pasta machine.
Photobucket
Little by little you will get to the last setting.
Photobucket
Now it's time to turn the stretched dough into pasta! We choose to use the fettucine setting.
Photobucket
Look how pretty!
Photobucket
We form little nests on a kitchen towel. Make sure to sprinkle the pasta with some flour while making your nests so the pasta won't stick together.
This recipe is from Mario Batali and it made about 1 1\4 pounds of pasta.
Photobucket
Cover the pasta with another kitchen towel until ready to use. Cook for 2-3 minutes in salted boiling water and top with your favorite sauce!

Sunday, December 20, 2009

Day 11: Traditional Scalette Cookies.

The 12 Days of Christmas Baking On the 11th Day of Christmas my true love gave to me.. My families traditional Italian Christmas cookies, Scalette.

Photobucket
These cookies are very important to our family. A Christmas without Scalette is no Christmas at all. This recipe has been handed down several generations. We love Scalette because they are fun to make and you can top them with anything you want! These cookies are from the region of Calabria. In our town they are called scalette but they are also know in other towns as scalille or scalidde. Some of our favorite toppings are: honey,a homemade anise flavored liquor icing, and even melted chocolate! They are even so good plain! Scalette are composed of only a few ingredients, the time consuming part is rolling out the dough and shaping it in the traditional design. Now that our Mom has taught us how to make Scalette, we promise to make them for every Christmas and to continue to pass it down to future generations. Here is the recipe along with some step by step instructions! Ingredients makes around 2 dozen 12 egg yolks 8 TBS sugar 1 tsp baking powder 1 shot anisette liquor 12 TBS melted vegetable shortening, crisco 2 1\2 cups all purpose flour Vegetable oil Directions Put the yolks in a large mixing bowl. Add the sugar and mix on medium speed for about 7-8 minutes.
Photobucket
Add the baking powder and mix until it's combined. Now you can add the shot of anisette and mix until combined.
With the mixer turned on, add in the melted crisco.
Slowy add in the flour. First add the the two cups, 1 at a time. If they dough is still too sticky, you can add in the 1\4 cup flour in slowly.
You want the dough to look like this:
Photobucket
Once the dough is ready, put it on the counted and knead it for a couple minutes. You want the dough to be smooth like this:
Photobucket
You are know ready to start all the fun shaping! We play around with different shapes, but here is a demonstration of the traditional way from our town.
Take a small piece of dough and roll it out so that it is about 10 inches long and 1\2 inch thick.
Photobucket
Take a wooden spoon and dip the end in flour. Wrap the dough around it 4 or 5 times.
Photobucket
Slip the wooden spoon out and bring the rest of the dough down.
Photobucket
Wrap the rest of the dough around so it meets the top part of the cookie.
Photobucket
Now you are ready to fry! Fill up a large frying pan with the oil. Leave about 2 fingers at the top empty. These fry pretty fast. Only a minute on each side!
Here they are all done! We made this recipe x 3!
Photobucket
A close-up of the traditional shape fried.
Photobucket
Here are some other shapes we played around with!
Photobucket
Photobucket