Friday, February 5, 2010

We've Moved!!!

Good news!

If you are a returning visitor to TheArtofTwoTarts, please notice that we have moved up in the world.

That’s right, we're now on www.theartoftwotarts.com/!
Hope to see you there!

Monday, February 1, 2010

Blueberry Cheesecake Bars With An Oatmeal Cookie Crust

Photobucket

These are seriously the most sinful things we have created yet.

Blueberry Cheesecake Bars with an Oatmeal Cookie Crust and Crumb Topping. WOW. Now that's a mouthful! Lisa went ahead and created these up herself this past weekend. She put these together using her most favorite flavors and created this fruity, chewy, creamy, sweet, tart, and buttery treat.
This recipe is definitely one that you want to try. Seriously. There is nothing more to say.
Ingredients:

Crumb Topping
1/2 cup flour
1/2 cup sugar
1/2 tsp salt
1/2 cup butter, chilled and cubed
Oatmeal Cookie Crust
 1 cup butter, softened
1 1/2 cups light brown sugar, packed
1/2 cup granualted sugar
2 eggs
1 tsp vanilla extract
1 3/4 cups flour
1 tsp baking soda
1/2 tsp salt
1 1/2 tsp cinnamon
1/4 tsp nutmeg
3 cups rolled oats
1 cup raisins

Cheesecake Filling
12 ounces cream cheese
1/2 cup sugar
2 eggs
2 tsp fresh lemon juice
1 tsp vanilla paste (or extract)
1 pint fresh blueberries

Photobucket

Directions:

First go ahead and make the crumb topping. Comine the flour, sugar, and the salt in a food processor. Add the butter and pulse until the mixture is crumbly. Pour into a bowl and rub the mixture with your fingers until it starts to hold together. Keep cold in the refridgerator while you prepare the other layers.

Now, you can go ahead and assemble the oatmeal cookie crust layer. Preheat the oven to 350 degrees. Line a 13" x 9" baking dish with parchement paper.

In a large bowl beat butter, brown sugars, sugar, eggs and vanilla with a hand held mixer until well blended. In a medium bowl combine flour, baking soda, salt, cinnamon and nutmeg. Add dry ingredients to butter mixture, stirring until just combined.

Fold in oats and raisins. Use only 3\4 of the dough for the crust and press it lightly into the bottom of the baking dish. We used the remaining dough to make oatmeal cookies, but feel free to freeze and save for another use!

Now we can begin with the cheesecake filling. In a medium bowl, beat cream cheese and sugar on medium speed until light and fluffy. Beat in eggs, lemon juice and vanilla paste. Pour the cheese filling over the crust and, using a spatula, spread it out evenly. Scatter the blueberries over the filling. Lastly, sprinkle the crumb toppng evenly over the fruit.

Bake for 40 minutes. Increase the oven temperature to 375 degrees and cook for 10 minutes longer. If your crumb topping has not browned nicely, feel free to place the oven on broil for 5 minutes and this will do it!

Let cool at room temperature for an hour. Place in the refridgerator and chill for 2-3 hours. Lift the bars out of the baking dish. Slice in squares. We got 24 squares.

**These taste their best when chilled completely and eaten cold.

Enjoy!


Photobucket

Saturday, January 30, 2010

Risotto with Chicken and Vegetables

Photobucket

We LOVE making risotto. We make it once every 1-2 weeks. What we love so much about risotto, is that you can put so many different things in it. We've made risotto with just about every single vegetable! We have always wanted to make it with chicken and boy are we glad that we finally did.

This risotto is defintely on our top 5 list. It is VERY good. You have both your meat and veggies in this dish so all you need to do is serve this with a nice salad.

Enjoy this recipe!

Serves 6
Ingredients:
2 lb boneless, skinless chicken breast halves, cubed

5 tbsp olive oil, divided

All purpose flour

1 onion, chopped

5 cloves garlic chopped

1 lb button mushrooms, thinly sliced

3 carrots, thinly sliced

2 stalks celery, thinly sliced

1 leek, washed well and thinly sliced

2 cups arborio rice

1/2 cup white wine

4 cups simmering water, flavored with chicken boullion cubes

3 tbsp butter

3/4 cup grated Pecorino Romano cheese

Salt and pepper

Method:
Season chicken with salt and pepper. Heat 3 tbsp olive oil in a large skillet over medium-high heat. Sauté the chicken until well browned and cooked through. Place onto a plate and keep warm.

In the same large saucepan, heat 2 tbsp olive oil over medium-high heat. Add onion, garlic, mushrooms, carrots, celery, and leek. Cook until mushrooms are just beginning to brown. Add rice, stirring constantly, and cook 5 minutes more, making sure rice does not brown. Add wine, stirring constantly, and let totally evaporate. When wine is evaporated, begin adding stock 1/2 cup at a time, letting each addition evaporate before adding the next addition. You will probably need to do this 5-6 times.

After last addition of stock is added, begin tasting rice. Rice should be al dente when done. You need to keep tasting rice, because, depending on rice, you may or may not have to use all of the stock.
After last addition of stock is absorbed, remove from heat, and stir in chicken, butter and pecorino cheese and season with salt and pepper. Serve!

Photobucket

Friday, January 22, 2010

Broccoli with Balsamic Dressing

Photobucket

Are you guys tired of your same old broccoli recipes? Will you only eat these little green trees if they are covered in cheese? Well, we hate to break it to you, try not to cry, but you might as well skip the broccoli and eat just the cheese.

Our mom has been making this recipe since we were little. Since day one we have loved it and we hope (know) you will too!

Here is a delicious way to eat broccoli and not only is it super easy to make, it is very healthy for you.
We've been tying to eat really healthy lately. We're about to get into juicing vegetable and fruits.

Do any of you juice??

By any means this does not, we repeat, DOES NOT mean we will stop baking! Just maybe a little less...

Well as for the recipe, here it is:

Ingredients:
2 head of Broccoli, cut into florets and stalks peeled.
5 Tbsp of Balsamic Vinegar
2 Tbsp of Extra Virgin Olive Oil
1 1\2 tsp Salt
1\2 tsp Black Pepper

Directions:
Fill a medium pot halfway with cold water over high heat. When the water comes to a boil, add the salt and broccoli. Let the broccoli cook for 5 minutes. They will turn a bright green color and be tender, but not mushy. The longer you cook vegetables, the more nutrients you loose.

Drain the broccoli and place them in a medium bowl. Let cool for 10 minutes. In the mean time, mix the remaining ingredients in a small bowl.

Once the broccoli have cooled down, pour the dressing in and toss the broccoli.

We serve these at room temperature.

Photobucket

We hope you guys enjoy our recipe!


Thursday, January 21, 2010

Happy Birthday Sarah! - White cake layered with pastry cream and a strawberry filling

Photobucket

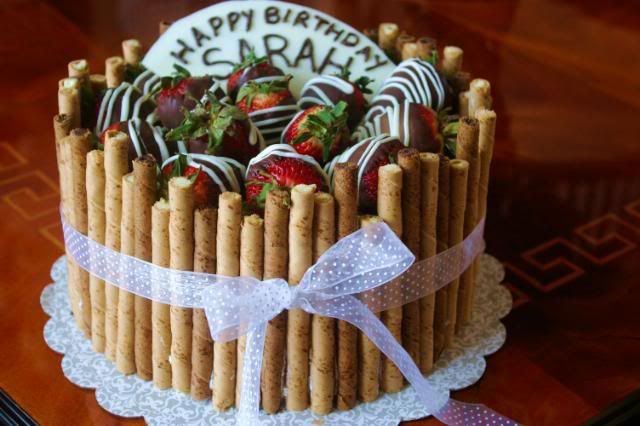
Another birthday!! These few months ahead are going to be really busy for us! We have 9 family birthdays from January to April! CRAZY! Up until last week, we had only made birthday cakes for family members. Last month, our good friend Sarah asked if we would make a birthday cake for her birthday party in January. We of course said yes and began creating this cake!

We truly had too much fun and we're very happy how it turned out! This cake looks so impressive but it so easy to decorate. You don't need any pipping skills and we think many of you will like that idea. It only took us 30 minutes to assemble the cake from start to finish.

Here is the recipe:

White Cake
We used Bridget's white cake recipe from The Way the Cookie Crumbles. We LOVE her blog! It's her adaption of the Cooks Illustrated's White Cake. You can find the recipe here. We 1.5x the recipe because we made a 9in cake (Bridget's recipe is for an 8in) and because we didn't want the layers to be too thin!

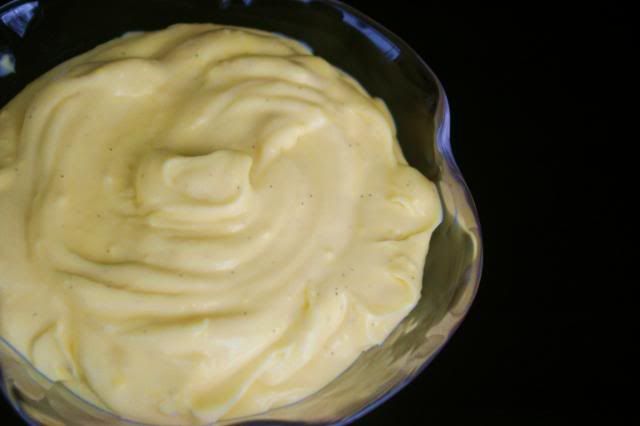
Pastry Cream Filling
Recipe below.
Plus 1 pint of  fresh strawberries sliced and mixed with 1 Tbs of sugar.

Strawberry Filling
Recipe Below

Frosting
3 cups of heavy whipping cream
1\3 cup confectioners' sugar
1 tsp vanilla extract

Beat whipping cream in a stand mixer until soft peaks form. Fold in the sugar and vanilla. Continue beating until peaks are stiff.

Pirouette Rolled Wafers
1 tin of the French Vanilla flavor, trimmed into different heights.
1 tin of the Chocolate Fudge flavor, trimmed into different heights.

Chocolate covered Strawberries
6 oz of semisweet chocolate, chopped
3 ounces of white chocolate, chopped
15-16 large strawberries
Put the chocolates in seperate microwave safe bowls.
One at a time, melt the chocolate in the microwave in intervals of 30 seconds, stirring each time. Heat and stir until smooth.

Line a baking pan with parchement paper. Hold the strawberries by the stems and dip each one into the semisweet chocolate. Lift and twist the strawberries to let the excess chocolate drip off. Then place onto the parchement paper.

Dip a fork into the white chocolate and drizzle the chocolate over the dipped strawberries.

Let the chocolate set.

**We made the cake, fillings and dipped strawberries the night before. We find this so helpful and in the morning, we just have to make the whipped cream and assemble the cake!

**After the cake cools, we wrap the cakes in plastic wrap and this keeps them really moist!
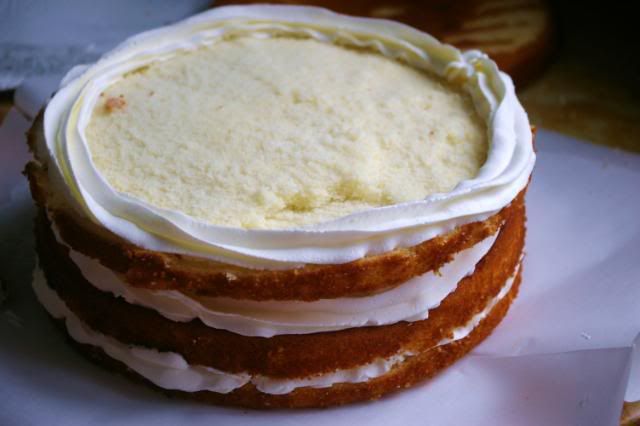
Lets Begin! Here are step-by-step pictures to show you how to assemble the cake!

Take both layers of cake and cut each layer in half so you get 4 layers.
Photobucket

Place one layer of cake, cut side up, on a cake board and pipe a ring of whipped cream around the edges of the cake. This keeps the filling from oozing out!
Photobucket

Place half the strawberry filling in the middle and smooth it out to the edges.
Photobucket

Place the second layer of cake, cut side down, on top and pipe another ring of whipped cream around the edges.
Photobucket

Place the pastry cream in the middle and smooth it out to the edges.
Photobucket

Place the fresh strawberries on top of the pastry cream.
Photobucket

Place the 3rd layer of cake, cut side up, on top and pipe another ring of whipped cream around the edges.
Photobucket

Place the other half of strawberry filling in the center and smooth out.
Photobucket

Place the last layer of cake, cut side down, on top.
Photobucket

Cover the entire cake with the whipped cream.
Photobucket

You don't have to be perfect because all of this will get covered up!
Photobucket

Place the rolled wafers, alternating the flavors, around the sides of the enitre cake. When done, tie some ribbon around the cake to help hold the wafers in place! Place the dipped strawberries on top of the cake. The wafers will keep them from sliding of the top. (Not pictured)
Photobucket

Here is the recipe for the pastry cream. Our FAVORITE recipe! Sooo very good!
Photobucket

Ingredients:
2 cups of half and half
1\2 cup sugar
Pinch of salt
5 large egg yolks (you'll need the whites for the cake!)
3 Tbs Cornstarch
4 Tbs of unsalted butter, cold and cubed.
1 tsp vanilla paste (You could also use one vanilla stick or tsp a vanilla extract)

1\2 cup of whipped cream ( We do this to make the cream lighter and it seriously makes a BIG difference)

Directions
Heat the half and half, vanilla paste, 6 Tbs sugar and salt in a medium pot over medium heat until it starts to simmer.

In the meantime, whisk the egg yolks, in a medium bowl, with the remaining sugar and cornstarch for about a minute.

When the half and half mixture reaches a full simmer, pour have of if into the egg mixture bowl and whisking constantly.

Return the mixture to the pot and whisk the cream over medium heat. Let the cream thicken for about 1-2 minutes. Once the cream has thickened, turn of the heat and mix in the butter until melted.

Strain the cream through a sieve over a medium bowl. Cover the bowl in plastic wrap and press the wrap directly over the cream so that a skin will not form. Refridgerate until cold and set.

Once the cream is cold fold in the whipped cream. Use right away of refridgerate until ready to use.


Here is the recipe for the strawberry filling.
Photobucket

Ingredients:
3 cups of slice strawberries
1\4 cup granulated sugar
1\2 cup of water
1 Tbs fresh lemon juice
1 Tbs cornstarch

Directions:
Mix everything, besides 1 cup of strawberries, in a medium pot over medium heat. Let the mixture simmer for 15-20 minutes until the strawberries have melted a little and the mixture has thickened.

Turn off heat and mix in the last cup of sliced strawberries.

Transfer to a medium bowl and cover with plastic wrap. Refridgerate until cool.

Here a view of the cake from the top! Doesn't it look so pretty!


Photobucket

Sunday, January 17, 2010

Rainbow Cookies: Happy Birthday Marilena!!

Photobucket
It's hard for us to believe that our oldest niece turned 12 years old today! Us being the youngest in our family, we remember people telling us, "Oh my God, I remember when you guys were born" or "Wow, you guys have grown up!"
Well, I guess this time we are the ones saying those things. We can't believe how much our niece has grown up! We can remember 12 years ago, we were in the 7th grade, we were so excited to become aunts. Since we were the youngest, it was so fun to have a little baby around!
When Marilena was born, we can remember being on the way home from school, and our mom would tell us that our brother, sister-in-law and Marilena were coming over that night. Right away, whoever being the fastest, one of us would scream out, "I call to hold Marilena first!"
Time has gone by SO fast and Marilena has grown up SO much. Next year she will be going into her teenage years and that is so crazy to us. She has truly grown up to be such a beautiful girl!
Look how pretty she is!
Photobucket
We wish we would have looked like that in the 6th grade! The years from 6th-8th grade definitely weren't our prettiest years... :
We celebrated her birthday last weekend. Lisa made these cookies for the party. They are made from our favorite chocolate chip cookie recipe that we have posted before. You can find it here.
The only thing Lisa changed was that she used mini M&M's instead of chocolate chips.
They are especially great for kid parties because of all the colors!
Photobucket
Be sure to only bake the cookies for 12-13 minutes at 375 degrees. You want the edges to be brown only. The center might look a little raw and soft, but the cookies continue to cook after you remove them from the oven.
We only let our cookies cool for about 8-10 minutes and then we put them into a ziploc bag. The cookies stay soft and chewy this way.
Photobucket
Happy Birthday Marilena! We love you so much!
<3

Thursday, January 14, 2010

Tart N' Tangy Frozen Yogurt

Photobucket

I don't know if it's just us, but we have been going crazy for tart frozen yogurt since this past summer. We know on the west coast, everyone is crazy about Pinkberry but here in Chicago, we have Berrychill, Red Mango, and Yogenfruz.
Tart frozen yogurt is something where the first time you try it, you're not crazy about it. We think because most people don't expect the tartness at first, but once you keep trying it YOU WILL FALL IN LOVE WITH IT!
There is something just so refreshing about the tart and tangy yogurt and fresh fruit to go on top of it. Not to mention you can have dessert without feeling guilty! Now that's what we're talking about! Last summer we discovered Berry Chill and Red Mango in Chicago. We were so happy and soo sad at the same time. You ask why? Wellll, because we live 40 minutes from Chicago! Our cravings were getting too strong and we had to figure out something else! Luckily a few months later, we discovered there was a Yogenfruz 15 minutes away from our house! To make things even better we realized how simple it is to make! So basically we were hooked for good! But that's not a bad thing, its good to be addicted to frozen yogurt. We think....right??
Take a look at the super easy recipe:
First we mixed 3 cups of greek yogurt with 1\2 cup of sugar. ( The less sugar you put the more tart it will be. With 1/2 cup of sugar it was slightly sweeter than what we get at Yogenfruz, Berrychill, & Red Mango.)
Photobucket
Then, pour it into your ice cream machine! Look at the creamy goodness! YUMMMYY!
Photobucket

While you wait for the ice cream machine to do its thing, you can get your toppings ready.

Our favorites are: strawberries, blueberries, kiwis and most of all coconut flakes!!

We LOVE that the topping options are unlimited! Another good combo is strawberries, mangos, and a drizzle of honey. You can basically mix any of your favorite fruits, and you can even add other toppings like, crushed cookies & chocolate chips.

Photobucket

Great, after writing this post we are having another frozen yogurt craving! Off to Yogenfruz.. Ciao!